
How to Set Up an Email List
TL;DR Summary: Start building your email list from day one of owning a website to engage with your audience effectively. Use a reliable service like GetResponse to manage your list professionally and ensure your emails reach your subscribers. Follow simple steps to set up your list, create autoresponders, and test your system for a seamless email marketing experience. Ready to get started? Read on for a detailed guide on optimizing your email list strategy.
If you have a website, you need an email list. You should have this on day 1 of owning a website because you can start getting email addresses on your list and you can contact everyone on your list any time you want. You can have them come back to your website for an article or ask them to do something – like buy something from you.
Get a Email List Service
 You do not want to run your list yourself on your own server. You will run into all kinds of problems. Years and years ago, it was possible but now that spammers have taken over email, you need to do things the right way to make sure your email gets delivered to your list. To make sure that happens, you need to sign up with a service that will do this for you.
I’ve tried a bunch of email list services in the past. I’ve been on AWeber, MailChimp, Constant Contact, Robly, iContact and I’ve even tried to host it myself a few times. The best service I’ve found so far and the one I’m currently with is GetResponse. They are great.
With GetResponse you can set up your opt-in list, send autoresponders, set up forms and lots more. The service is reasonably priced and there are lots of plugins and software that have integration with GetResponse.
So the first thing to do is sign up with GetResponse and then come back here for the videos that explain how to set up your account, you list and get an email sign up form on your website.
Verify the List
This step is important because verifying email addresses could make or break things for you. You need to know the emails you have are good and real. People sometimes put in fake emails or they even type them in wrong. Any company you use to host your list will ask you if the emails you have are good, so you need to check.
Set Up Your First List
The first thing to do is set up a list so that you can add people to it and so the form on your website has something to connect to.
Good! You should have a list set up now and a form set up.
Create an Autoresponder
Next, set up an autoresponder. This will be a “Time Based” event in GetResponse. Your autoresponder thanks the person for signing up and it will also contain a link to the file that you promised them. The file is a PDF or some kind of report you’ve put together in exchange for their email address.
The file you’re delivering needs to be on your website so that it’s accessible to everyone. To get the file on your website, (in WordPress) simply go to:
Media > Add New
Then select the file from your computer and upload it.
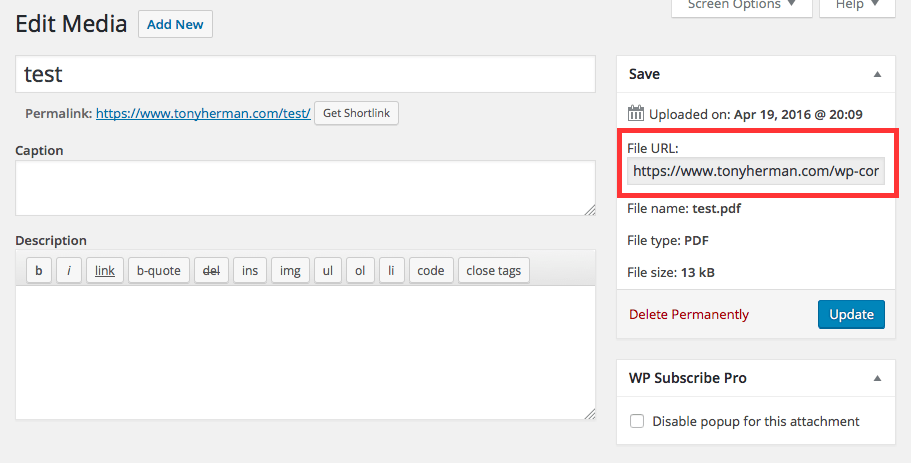
After you upload it, there will be an “Edit” link – click that link.
On the right side of the page, you’ll see: “File URL:” listed with a box under it. Select everything in that box and copy it. This is the URL (address) to the file:
Next, go ahead and set up your autoresponder in GetResponse. I like to do a plain text message and not use any fancy template – just to make sure the email shows up correctly and that there are no problems.
Test Your List
I like to always test any list I set up to make sure it works. I’ll sign myself up on it and then see if everything works like it should. I should be able to sign up on the list and then see the email with the link to my file show up.
If it doesn’t work, go through the steps again to make sure you did everything correctly. My first time doing this (a long time ago), I remember it didn’t work, so if that happens, don’t get mad but go through it again. If it still doesn’t work, you can reach out to the support staff at GetResponse for help. I’ve used their help before and they’re good.
📄 Download a PDF of This Article


