
Day 4 – Set Up Your New Website
 Buy a Domain Name and Set Up Your Website!
Alright, we’re finally ready to get your website set up. This should be fun!
We’ll go through buying a domain name and then getting WordPress set up.
There is some cost here. You do want to go with your own domain name and with paid hosting – not a free website. You’ll look a lot more professional, which means people will trust you more. Also, this ensures that whatever you publish is content you still own – that’s very important.
Yes, with some sites you give up ownership of your material when you publish it. That’s not good. You may want to sell your website someday like I did with a few sites and to do that, you need a domain name and you need control of all the content.
And you might even want to sell your website someday and you’ll need it all together, under a domain name that you control or else you can’t sell it.
Buying a Domain Name
It’s time to take a quick detour. Go read this article (it opens in a new tab) about my tips on how to choose a domain name and then come back to this page:
21 Tips on How to Choose the Best Domain Name for Your Website (tonyherman.com)
You should now have some good ideas for a domain name and you might have even gone and checked to see if some are available. If not, start doing that. I have a domain check tool here on my website.
Note: Someone on Twitter just started following me and he seems to be using the word “chef” in his name to mean guru or expert. I don’t think that works. The word “chef” is really exclusively for cooking and if your website isn’t about cooking, then that can be confusing. Don’t try to be too cute or clever. Your domain name should not be confusing at all.
My example website is about night photography and underwater photography. I want to make sure the website includes those topics plus be able to include other topics that are similar like time lapse photography or something like that. Here are the domain name ideas I came up with for my site:
- LearnCoolPhotography.com (a phrase) (available)
- PhotoTopix.com (brand) (not available)
- PhoTopix.com (brand) (not available)
- PhotoBrain.com (brand) (not available)
- PhotoSource.com (brand) (not available)
- FocalTopix.com (brand) (available)
- CameraTopix.com (brand) (available)
- CamCool.com (brand) (not available)
- MajorInPhotography.com (brand) (available)
- UncommonPhotography.com (brand) (not available)
- CoolPhotog.com (brand) (available)
You can see how I tried a bunch of things. Some were available and many were not. Formulate a list and then think about your domain. Take a few hours and don’t be in a rush. Work on your list, take a break and come back to it. Even ask some friends what they think of your list and which ones they like.
I’m going to go with the last one: CoolPhotog.com. I did a search on “cool words for photography” and saw “photog” listed. I then did a search on Google and Bing for “coolphotog” and it didn’t look like anyone was using that as a brand. And then Archive.org didn’t find a coolphotog.com website either… so, good enough for me!
Got a Domain? Get Your Website!
The next step is to get the website set up using WordPress.
I geek out on this part but it’s actually pretty easy. There are a lot of tutorials out there on setting up WordPress but I went ahead and made my own since I wanted to make sure my students had a good one to follow.
You’ll sign up for a website hosting account over at A2 Hosting – so go there and buy one as you watch the video below or after you watch it.
Connect Your Domain Name With Your Hosting
If you bought your domain name before you bought the hosting at A2 Hosting (not at the same time), then you’ll need to connect your domain name with the hosting at A2. You do this with something called DNS – also known as your name servers. If this connection isn’t made, then your website won’t work.
If you did purchase your domain name at A2, then you should not need to do this. Go to your domain name and test it. If it’s not coming, maybe wait 5 minutes. If it still doesn’t come up, then go through the steps here to test it – you won’t be logging in to GoDaddy for your domain name management but you’ll do that at A2.
OK, here’s how to do it…
The way to make this connection is to point your domain name to your hosting. You’ll most likely want to point the website portion of your domain name and the email part of your domain name to your hosting at A2. This isn’t very difficult but it’s a little technical.
When you signed up for hosting with A2, you received a “Welcome” email. In that email, they gave you what to use for your name servers. It should look something like this:

Your setting might be different – check to make sure. In this example, they gave me the server names and the IP addresses. The IP addresses aren’t important and they might change from time to time, so you can ignore them – what you need to note are the host names (ns3.a2hosting.com and ns4.a2hosting.com in this example).
What you’ll do is go to where you bought your domain name (the domain name registrar) and to into domain management, and set the name servers. Make sure you make the edits and save it. Here’s a video where I show doing this:
After you do this, it may take some time for your domain name to be pointed to your hosting. If you haven’t tried to go to your domain name yet, then it’ll happen faster for you (maybe 2-3 minutes). If you already tried to go to your domain name after you bought it, then your computer cached (saved) the location of the website when it wasn’t connected and for that to clear, it’ll take a few hours maybe.
When this is done, your domain name will be connected with your website hosting and email hosting at A2. You can then go into your control panel at A2 and set up any email addresses you want.
After You Install WordPress
You’ll see in the video that I went and did a few things after it was installed.
Here’s that list:
- Rearrange things on the Dashboard if you want
- Go to Posts and delete the sample one
- Go to Pages and delete the sample one
- Go to Settings > General and change what you like
- Go to Writing and put in my ping list
- Go to Permalinks and make sure “Custom Structure” is selected with “/%category%/%postname%/” in the blank area (no quotes) – here it is again:
/%category%/%postname%/
Those are the main things. I thought of two more:
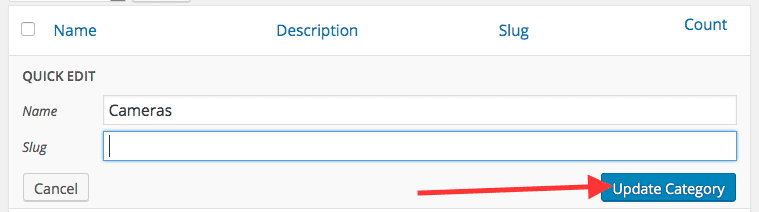
- Go to Posts > Categories and on the right where it says “Uncategorized” click “Quick Edit” (which shows up when you put your mouse over it. Set the name to something related to your topic (I’m using “Cameras”) and then clear out “uncategorized” where it says “Slug” and click “Update Category” – like this:
And then this important tip:
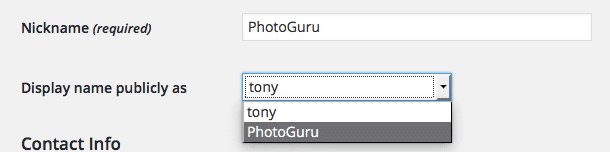
- Go to Users and click on your user name. Where it says “Nickname” put something in there – either your name or something like “PhotoGuru” and then select that in the pulldown where it says “Display name publicly as.” The reason for this is that you do not want your real username showing up there because that gives hackers your username and then they just have to guess your password. Here’s how it looks:
Next, Let’s Set Up a Theme
The theme in WordPress is the design. You can download or buy many kinds of themes. Some are good and some are actually bad. There are a few, main things you want to think about when choosing a theme:
- Is it responsive?
- Does it look professional?
- Does it load quickly?
- It is easy to use?
The term “responsive” refers to responsive website design and that means does it work across all screen sizes? Your website needs to look good on mobile devices like smart phones and tablets as well as desktop computers / laptops. When it uses responsive design, the same design (not another version of it) works with all screen sizes and then design responds to whatever size screen it’s being viewed on. Google likes this because you’re ensuring the best user experience possible.
Speed (load time) works the same way. A website that loads more quickly has an advantage over a website that loads more slowly. It’s a better user experience.
Your website also needs to look professional because this makes your website look trustworthy. It can’t look like it was done by an amateur. If the theme is easy to use, then it’ll be easy for you to put in content without having to make a lot of adjustments manually.
I’ve used themes from a number of places. There are free themes on WordPress.org. Some are good but with some, you get what you pay for (so, not much). I also like a lot of themes on ThemeForest.net. The WordPress themes I like the most are at MyThemeShop.
I like MyThemeShop because their themes are easy to use, they look great, they’re responsive (of course) and their support is excellent. Whenever I have a question, I get a response back quickly – within a few hours sometimes. They have some paid themes and a few, nice free ones, too.
Go, look around and find a good theme. Find one that meets the 4 criteria above and one that you like. Remember that even if they look a little drab, you can also make them look good with good photos and graphics. That’s actually the best way to think about design – go with something more minimal and then use great graphics and photos. This way, the focus (the “weight” we call it) is on the photos. If the design is too flashy and you add photos, then your photos are all of a sudden trying to compete with the design and the result is a website that looks too busy and confusing.
Here’s a video that discusses finding a theme and installing it:
Installing Your WordPress Theme
 If you use a theme at WordPress.org, then you’ll use the built-in theme installer in WordPress. If you buy a theme from another place or get a free one, then you might end up with a zip file. I’ll show you how to install a theme with both methods here.
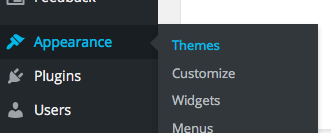
In your WordPress Dashboard, go to:
Appearance > Themes
Here is where you can see which themes you already have loaded, switch themes, browse for new ones or upload a theme that you have (zip file).
There are some themes that come with WordPress. I’d suggest NOT using one of them – as explained above, go get a better one.
Use WordPress.org
To browse for themes at WordPress.org, click on “Add New” at the top.
 You can browse the most popular ones or type in a keyword. Put in “magazine” there because you’ll want a theme with that kind of layout.
When you find the one you like, just click “Install” to install it on your website. The “Preview” function doesn’t really work too well in my opinion because they’re not showing it to you all set up – they’re using the same sample data across all the themes they have and it’s just not going to look like the theme publisher intended.
Once it has been installed, go ahead and activate it. You’ll then want to go look for the options for that them so you can change the logo or other settings. You can usually find those settings when you go to:
Appearance > Theme Options
Nobody’s really going to your website yet, so feel free to play with the settings and see what you can do with that theme. You might even try installing a few themes to see which one you like the best.
Upload a Zip File
If you bought or downloaded a theme, then you should have a zip file. What I like to do with theme zip files is make sure you’re uploading the right thing, so I unzip it and see what files are there. If you unzip it and in that folder, there’s an “index.php” file and a “screenshot.png” file, then that’s a theme zip. Delete the folder you made and keep the zip file.
In your WordPress Dashboard, go to:
Appearance > Themes
And then click “Add New” at the top.
On the next screen, click “Upload Theme” at the top. Browse for your theme’s zip file and then click “Install Now” to upload and install it.

Once it has been installed, go ahead and activate it. You’ll then want to go look for the options for that them so you can change the logo or other settings. You can usually find those settings when you go to:
Appearance > Theme Options
Nobody’s really going to your website yet, so feel free to play with the settings and see what you can do with that theme. You might even try installing a few themes to see which one you like the best.
And then here’s a video where I show how to install and play around with the “Authority” theme from MyThemeShop:
And then here’s a video showing the “Point” theme, which I really like… and it’s free:
Once you’ve set up your theme, I suggest you check it on different devices to make sure it looks good. Try asking your friends to bring it up on their phones, try an iPad, try a desktop/laptop computer – any device you can get a hold of.
Maybe the names you chose for your categories are too long and it’s messing things up. It’s ok to shorten those names – they don’t have to be exact keywords. Your website must look good to humans – not just search engines. Humans are the ones with money after all, right?
A Logo for Your Website
To make your website look great, it should have a logo because that’s your brand. You’re going to use it on your website, your social media and other places. You can change it later but it’s really good to start off with a good, recognizable logo that’s catchy and looks great.
You have a few options with a logo:
- You can try to make one yourself
- You can go with just text
- You can have a logo made professionally
The thing with logo design is that it’s actually not easy to create one if you want it done well. People think they can just create something and they might think it looks good but when they show it off to friends and get some honest opinions, they find it doesn’t look too great or professional. It’s best to leave it to professionals who know what they’re doing.
I’ve made a few logos myself but with my company, I’ve given it over to my design team to really do them right.
To get one done professionally, you can have someone do it at Fiverr.com for $5-10 or so or else go with other options I have in an article I wrote about logos.
One More Option That’s Kind of Cool…
Something else I’ve done on websites to help keep logos simple is to just use a symbol with the text. So, a symbol like an emoji. Start at FileFormat.info and type in what you’re looking for and it might be there.
Find the one you want and then get the “HTML Entity (decimal)” as seen here:

And then copy it (📷) and paste that into the Settings > General Settings page in WordPress where it says “Site Title” – like this:

And then it turns into the right character on whatever device it’s being viewed on. Pretty cool, right?
Make Sure Google Analytics and Search Console Are Set Up
On any new website, it’s good to have Google Analytics and Google Search Console running because you’ll later want to go and optimize pages to rank higher and you’ll need the data you find there. You definitely want to go and do this now so that you have some great data to use later:
How to Set Up Google Analytics and Google Search Console with WordPress (tonyherman.com)
Homework
Go ahead and work on your theme. Get your website looking nice. The video and instructions I gave here should really help you get your website off to a great start by using a great theme.
If you want to get fancy, learn how to set up icons for your website to help make it look even more professional.
We covered a lot today. This was one of the bigger days of the course.
Tomorrow, I’m going to give you something that should completely blow your mind! When you get the concept I present tomorrow, you’ll get really motivated and it could just change your life… if you let it!